Overview
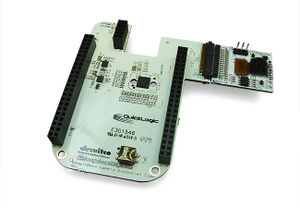
Here's the deal. I got a Beaglebone Black with the MT9T112 camera cape a few weeks back, and not surprisingly, the device driver was not written properly. The MT9T112 has a resolution of 2048 x 1536. So naturally, I would expect to be able to capture a 3.1 MP, 2048 x 1536 image right out of the box. But that would be too easy, wouldn't it? When I tried to capture a full image with the command
BB> root@beaglebone:~# mplayer -vo png -frames 2 -tv width=2048:height=1536 tv://
I did not get an image. Instead, I was dragged head-first deep into the world of Embedded Linux.
Tracing the Problem
The above command immediately comes back with a series of warnings/errors. But even when you plug in some "valid" image dimensions, e.g. width=1024:height=768, you still get a lot of the same ones. The real failure is indicated by the line
v4l2: ioct request buffers failed: Cannot allocate memory
which tells us that the camera is using the v4l2 driver. And the dmesg command digs a bit deeper to reveal
[510127.263183] cssp-camera cssp-camera: dma_alloc_coherent of size 6291456 failed
Now, I don't have the solution to the above problem. I'm still working on that. QuickLogic, the guys who wrote the device driver for their CAMIF (Camera Interface), told me that they don't have a solution either. If you're reading this bit and you know how to solve the problem, please email me and let me know. It obviously involves the libraries that handle DMA on the TI OMAP 355x.
For the moment, I'm still looking at the source code trying to figure out what is going wrong. The reason I'm writing this page now is because the process of getting the source code was extremely difficult and poorly documented. I'm hoping I'll save those of you interested in getting the Angstrom Linux kernel source some time and frustration.
Getting the Beaglebone Source Code
Now, I'm going to be writing this assuming you're using Ubuntu Linux to download the Beaglebone kernel source. If you're not using Ubuntu, your steps will be slightly different. The basic framework should still apply.
I'm sure there are other routes you could take to get the source, but the one I'm going to be covering involves the OpenEmbedded software suite. If you're a newbie to this, you'll find it's a pretty steep learning curve. You may have compiled the Linux kernel on a desktop by doing a bunch of complex configuration and using make. This isn't quite the same. In a nutshell, OpenEmbedded takes a bunch of configuration files on your machine and uses them to pull together all the source files and patches you need for your particular device and your desired setup. It then uses the Bitbake utility to cross-compile the source into an image. Bitbake is kinda like make, or at least that's how I like to think of it.
To be perfectly honest, I don't understand the real difference between Yocto, OpenEmbedded, and Angstrom yet. They are all intertwined in a strange way and I can't seem to find any real good explanation of what is what. So if you're an expert at this stuff, please don't take offense to any of the nomenclature I use.
1) Download OpenEmbedded Dependencies
To get started, you'll need a bunch of dependencies.
> sudo apt-get install gawk wget git-core diffstat unzip texinfo build-essential
         chrpath libsdl1.2-dev xterm
2) Get the Angstrom/OpenEmbedded Setup Scripts
Then you'll want to create a directory for all the Angstrom/OpenEmbedded files and download them. You can name the directory whatever you want. This is just an example.
                  > cd ~/Desktop


                  > mkdir Angstrom


                  > cd Angstrom


                  > git clone git://github.com/Angstrom-distribution/setup-scripts.git
You should then have a "setup-scripts" directory with the following files
                  > cd setup-scripts


                  > ls


                  bitbake.lock  build  conf  oebb.sh  pseudodone  README  scripts  sources
3) Configure the Build to Keep the Source
This is the key step! I must have built the Angstrom image a half a dozen times only to find that I had a bunch of object (.o) and header (.h) files, but none of the source (.c) files I was looking for. In order to prevent OpenEmbedded from deleting all of the source after its done building the image (which it does to preserve disk space, I believe), you have to remove a key directive in the configuration files.
Open up the ./conf/local.conf file and comment out the
#INHERIT += rm_work
line. It should be in the first few lines of the file. The # in front of INHERIT means it's commented out.
4) Download Source and Do the Build
I'm using tcsh as my shell, so if you're using bash or something else, your exact syntax will be differnt. For me, the commands to get things going are
                > setenv MACHINE beaglebone


                > ./oebb.sh config beaglebone


                > ./oebb.sh update


                > ./oebb.sh bitbake virtual/kernel
This last command will take awhile. I'm running Ubuntu with VirtualBox and 1024 MB of dedicated RAM and it takes about 6 hours to complete.
5) Check Out Your Source Code
If you followed all of the above steps, you should have the source code and your disk image. They aren't easy to find if you don't know the directory structure that OpenEmbedded uses. And it's made worse because the manual isn't quite up to date. There is a good chance the path on your machine will differ from mine slightly, but here's where the source is for me
cd ./build/tmp-angstrom_v2012_12-eglibc/work/beaglebone-anstrom-linux-gnuebai/
        linux-mainline-3.8.13-r23a/git/
And the disk image is located here
cd ./build/tmp-angstrom_v2012_12-eglibc/work/beaglebone-anstrom-linux-gnuebai/
        linux-mainline-3.8.13-r23a/deploy-linux-mainline/
And there you have it. You should now be able to start diving into the source code to figure out how to change whatever you need to change. Once you've made those changes, you'll have to recompile your build. I still haven't crossed that bridge yet, but once I do, I will update this site with another page to describe how I did it.